


If you are thinking about or in the process of remodeling your bathroom, then listen up! Whether you are hiring someone to do it or you want to be a hero and do it yourself, there are some essential things you must keep in mind.
Not sure exactly the order in which to do things? Great! Most people don’t have a clue either. Before you get too far in and then think “shit, what I have done?” I remodel bathrooms for a living so sit back, relax and go through this list in your own time.
I’ve shown this checklist for you, so your bath remodel goes as smoothly as possible. Keep in mind that during the project and depending on your bathroom, you can have up to 8 or more different sub-contractors before your project is finished so it can get overwhelming. Here’s what you need to do:

Before you even begin demolition. This will help you find someone that knows what they’re doing. It will mean the difference between finding a good, trustworthy professional and a flake/con artist/crook. If you’re doing this by yourself, skip this part.
Selections – If you’re done looking through magazines/watching HGTV/having emergency United Nations meetings with your friends about your sweet bathroom, then you need to make your product selections. If you’re working with a designer, they will do this for you, but if you’re doing it on your own, then I’ve listed some ideas to factor in below.
1. Demolition
This is the first stage of the actual work where the old goes out in preparation for the new. This is the stage where you can see if any further work needs to be done once the shower, cabinets, walls, etc. are torn out.

Often we would tear out an old shower and find mold or completely rotted 2X4’s or damaged insulation that needs to be replaced.
Please pay close attention. Damaged materials like this must be replaced before the next phase begins otherwise you will get serious moisture problems down the road. Have your contractor show you the actual damage, either physically or by pictures to ensure repairs need to be done.
2. Plumbing
This is the very first thing that needs to be done inside your shower unit after demolition. Whether you are remodeling an existing shower or converting a tub set up into a walk-in shower, make sure you have your shower valve and plumbing fixtures at the house before or as soon as demolition is done.

The plumber at this stage needs to rough in the shower valve and if necessary, raise the shower head and move the drain. This is also the stage where he has to rough in any special plumbing arrangements like diverters, body sprays or rain shower heads.
If you are installing a new tub, he needs to ensure the correct set up is in place before tiling begins. I also recommend having them check all your angle stops and water lines to make sure they are right.
Be sure to communicate with your contractor exactly what type of set up you want because the plumber will work according to your specifications. He may also need to come back throughout the job and install things like tub faucets, hook up sinks and put in other plumbing like commodes and vanities.
Electrical
This involves everything from wiring up your electrical fixtures to recessed lighting, shower lighting or any other lighting and audio-visual elements. He may also need to hook up a tub depending on what type it is and ensure the circuitry in the bathroom is correctly done. Always ensure the electrician is licensed and qualified to do the work (don’t play with electricity).

The electrician should test your plugs and ensure you have a working GFI in your bathroom. This is from a safety standpoint since it would be a serious breach of standards if there were no GFI in your bathroom.
The vast majority of the electrician’s work is done right after the demo. Let him cut into as much sheetrock as he needs so he does not have to mess up a newly painted area later.
Better yet, let him work before any drywall goes up so they can knock everything out unhindered.
3. Wall Prep, Shower Pan & Tile
This is where your bathroom starts coming together.
Wall Prep – All wet areas including shower walls, half walls, etc. should have the minimum waterproofing of hard backer sheets put throughout. These give superior moisture protection, and it’s crucial so if your contractor doesn’t put any concrete board like this up, ask him if he’s feeling okay. It must be done!
As an extra precaution, you may put a waterproofing membrane over the hardboard, but I have never had any moisture problems with using just hardboard. 13+ years. Not a single moisture problem.
Tile – There are so many different options to go with and what you pick should match with your lifestyle. If you have a taste for natural stone then travertine, marble, granite or slate will be an excellent option for you.
Natural Stone needs to be sealed to keep looking pristine; so keep that in mind when choosing stone. Porcelain tile is probably the fastest growing and popular option because it is less expensive than stone, faster and easier to install and because it is so dense it does not need sealing or the maintenance that stone does.
Selecting a tile and the color is one thing, the layout is another. I can tell you right now the way you lay the tile out is going to greatly impact the overall look. Using decorative and mosaics as well as accents can enhance the overall effect. You are only using a small quantity of them so you can get a very expensive look for relatively a small investment.
As a general rule, larger tile over smaller size. Your larger size tile gives you fewer grout lines = less cleaning. It also looks a lot cleaner too and not as busy. If you lay the tile in a straight, square fashion you get a more contemporary look, but many people think that is too boring.
The other thing to keep in mind is the tile format. Fifteen years ago all you had was pretty much square tile now you get tile in all different sizes, colors and textures from small 3 x 6 subway tiles to large 12 x 24 rectangular ones and beyond. I have noticed bath and shower walls that are more horizontal in shape look good with elongated tile.
Shower Pan – The installer may do this before or after putting up the hard backer on the walls, but this is one of the most critical aspects of the shower. Done incorrectly, it could mean the water doesn’t drain, your shower glass doesn’t fit right and a lot of money wasted. Make sure a few basics are met…like testing to see if the shower pan drains correctly. Put a golf ball in each corner, and it should roll back towards the drain
4. Shower Glass
ALWAYS GO FRAMELESS.
You will thank me later. It looks ten times better; you don’t have to worry about those “what were they thinking” brass and silver colored frames, and it gives the shower unit an excellent display. For the same square footage of glass, you are not looking at that much more for a frameless unit.
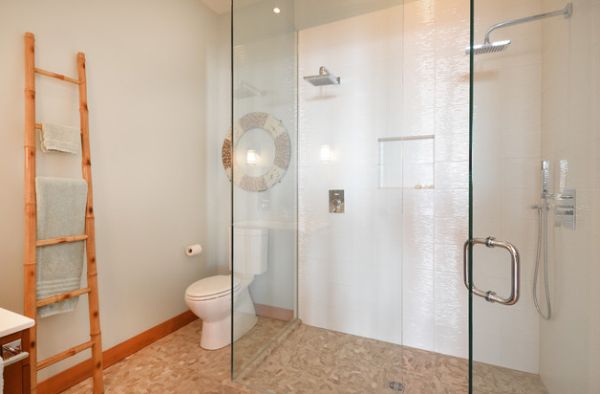
Remember, once the glass is cut and ordered it cannot be re-used and you’ll be charged for it anyway. Make sure the glass is tempered. Tempered glass when it breaks (in the case of an accident) shatters into small pieces with rounded edges and far less likely to cut you as opposed to non-tempered that breaks into large shards and slices through anything that it touches.
Some companies offer glass sealant which protects the glass from oxidizing for a certain number of years. Oxidizing is when your glass takes on a dreary grey film and ugliest out. Very common in windows and builder’s grade, crappy shower doors. You may want to request the door handle and hinges match the rest of your bathroom fixtures.
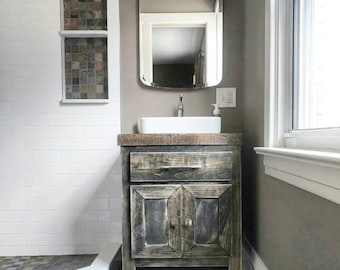
5. Cabinets & Vanities
So do you keep your current cabinets or get new ones? Do you repaint, restrain, or touch-up? Should you get custom cabinets or readymade? Well, here are the pros and cons of each Refinish.
Pros: Can choose any color you like for the new look. No need to demo existing. Good option for budget-conscious jobs.
Cons: Messy-on-site work, lots of dust, fumes from stain/paint, etc. Can work out not much less than ready-made. Make sure the painter inspects the cabinets and verifies that they can be refinished.
Buy readymade units:
Pros: For vanities, there’s minimal assembly, relatively quick delivery if in stock, gives an instant, recognizable brand new impact, pre-finished and great bang for your buck.
Cons: Limited to available color selection, may not come in the suitable size for the area.
Custom:
Pros: Exactly how you want it to look, color wise and specifications.
Cons: Several weeks lead times ranging from 3-12 weeks. Get ready to pay baby!
If you want something, custom nothing compares to having quality hand-made cabinetry. You can add extra storage units, drawers, doors and even shelving. I work with a lot of maples and it never fails to excite people.
Since there are many different types of wood species available, check your options with your contractor. Add a few tasteful handles, and the entire unit is a show stopper.
Quick tip: if you are going to go with dark cabinets like a rich mahogany color in the picture above, a lighter countertop works exceptionally well. If you go with light cabinets, go with darker countertops. The stark contrast between the two gives you a very striking look.
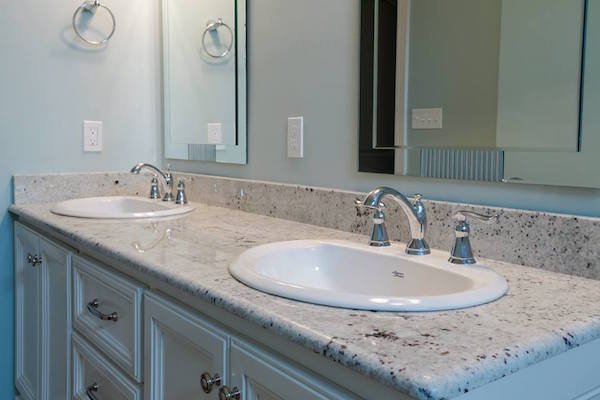
6. Countertops
If you are getting custom cabinets and vanities made, these are the showcase feature of the bathroom. Depending on the size it can make the room pop. Whether it’s marble or granite, the right stone ties everything together.
Some folks are wary when it comes to marble because it is a softer material but keep in mind it is going to your vanity tops and not receive foot traffic. 2cm or 3cm thicknesses are available.
It is a matter of personal taste, but the main difference is one is thicker than the other which is sometimes preferred by fabricators as it’s less fragile to work with. When you are picking out your slab check and see the thickness of the stone. So should go with marble or granite?
Well, do you like the sudden, random veining of marble or the speckling of granite? Granite is harder but then again for a vanity countertop this isn’t a deal breaker.
Check with your contractor if you can personally pick out your slab. I take clients to slab yards where they choose their slabs, so they get exactly what they want. Any leftover you can use on your shower bench, window sills or half walls.
Enough to make the most miserable people smile. You have a choice of edge finishes as well. The most popular that I see the Demi Bullnose edge. Check with the fabricator if there is the extra cost for specialty edges like Ogee because most of them do charge additional. This aspect of the remodel goes in right after the cabinets are done (assuming you are not buying an already made vanity).
The stone must be sealed after installation. Also, make sure you specify what type of sinks you want so they cut the stone correctly at the shop. I’ve seen rectangular cut outs done before for oval sinks, lol Undercount sinks are the most popular but lately I have seen a surge of vessel sinks.
If you are particular about the holes in the faucets, then specify if you want the holes cut straight or if you would like them to follow the curve of the sink.
7. Paint
This is the stage you get to have a lot of fun by hurling paint-filled balloons at each other. Color is the number one factor because it can completely change the entire mood of the bathroom.
I always get asked does the paint have to match the tile, cabinets, and fixtures. The short answer is no. It should coordinate nicely. By that mean so long as your colors are within the same family and from similar tones, then the coordination always seems to work very well.

The type of texture is completely up to you but the safest option is your standard orange peel or knocks down textures although I have seen the smooth finish, and when done correctly, it’s like having one giant baby’s butt on your walls. Generally speaking, your walls should be the same color, and your trim should be white.
The ceiling should also be white or the same color as your walls. Don’t go to the paint store and get swatches and say yes that is what I want.
Quick Tip: Pick the color swatches you want then go home and tape them to the wall. View them at all hours of the day because the color will look different throughout the day.
Don’t worry, at night when you’re asleep they all look black. Once you have narrowed down to the few swatches, you like then get a wet paint sample. If you don’t know where to start pick 3 or 4 colors you like or are open to.
From there pick two sub colors. That will give you plenty of choices to narrow down otherwise you will be stuck looking at thousands of colors, and you’ll be looking until Rapture.
Brighter colors have the opposite effect. If you are undecided which colors to go with, take a look at your natural lighting? If you have a lot, then don’t shy away from darker tones and if you get very little to no natural light, I will go for lighter. Since this is close to the very last stage of the remodel, you have a little time to play around with your choices.
Ask the painter to leave you leftover paint/stain in case of any future touch-ups.
8. Lighting
Hanging your light fixtures and trimming out recessed cans, etc. is a final stage thing but please keep in mind, the bulk of the work needs to be done right after demolition.

Make sure you let the electrician know in advance that you plan on changing your light fixtures. These usually go on at the very end, but the wiring needs to be done at the very beginning.
Light fixtures like any bathroom fixture are a matter of personal taste.
9. Accessories
These are the finishing touches and very last items to consider. Things like towel holders, toilet paper holders, hooks, etc. are the decorative nick nacks that you can add to compliment the rest of your bathroom.
To guarantee that the temperature of the water is appropriate for your baby not very hot or excessively cool there are a few things as unexperienced parents that you can do. You can either test the temperature of the water utilizing the customary strategy for plunging your elbow or wrist into the water as your mom would have done. The other path is to buy an extraordinary thermometer which changes shading when the water temperature is right. These thermometers will turn red if water is excessively hot, blue if it is chilly and green if the temperature is perfect.
When bathing your baby ensure that you utilize items suited to them rather than the sorts you would use on yourself. Additionally, with regards to washing their hair, it is a smart thought to put wool over their eyes keeping in mind the end goal to keep cleanser from getting in them.
Parents love the bath time involved with their baby. It is a fun and upbeat holding time for them. Scrubbing down safety precautionary measures will restrain mischances and damage to your newborn child. At the point when babies get wet from the bath water, they can turn out to be extremely dangerous and challenge to clutch, so it is critical that you take after these bathing safety rules.
One thing unseasoned parents need to mull over is the place they will bath their new baby. A grown-up bathtub is an incredibly perilous place for an infant, and the sink isn't perfect. You need to purchase an uncommonly made bath tub for baby to guarantee their safety and to make it less demanding for you to bathe them no sweat.